

I don't know what it is about the summer, but for some reason when this weather hits it boosts my spirits and makes me want to bake almost every single day! If only butter and crème cheese weren't so expensive... I have to say I probably would!
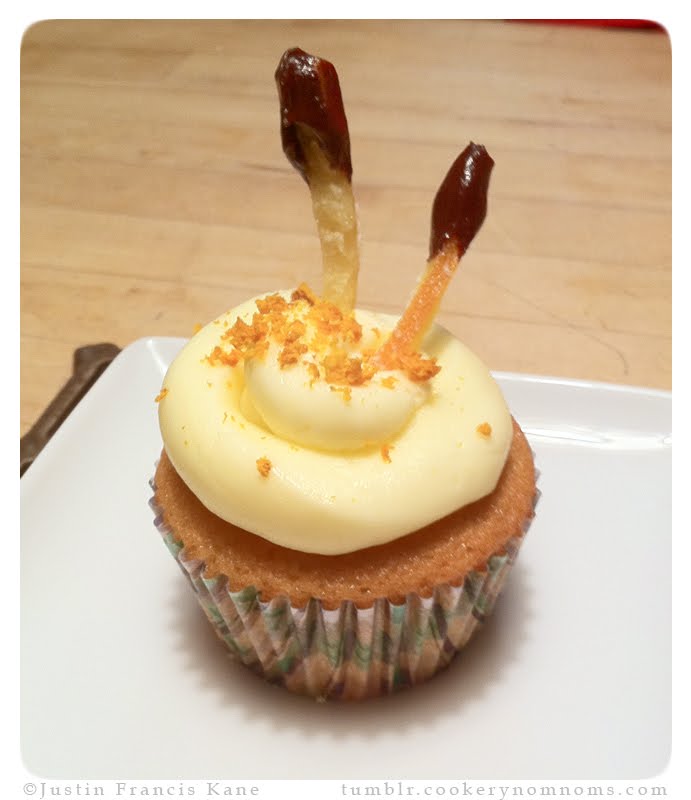
These Orange Zest Cupcakes are a perfect mixture of light and sweet flavors. Not over powering, and with a bittersweet surprise hidden in the center. You’ve had one of those chocolate oranges around Christmas where you slam it on the table and eat the individual slices? That’s what I was going for, but not so rich!
The garnishes are also candied orange peels rolled in sugar; so if you have the extra time, don’t forget to make these! It’s a lot of fun and totally worth it.

Ingredients for Orange Batter
• 1.5 cups of flour
• 1 cup of sugar
• 2 large eggs – room temperature
• 1 stick of butter – room temperature
• .5 cup of fresh squeeze orange juice
• .5 cup of heavy crème
• Zest of one whole Naples orange
• 1 tsp baking powder
• 2 tsp baking soda
Now I learned from my friend Kamran over at The Sophisticated Gourmet, a thing or two about mixing my cupcake batter. For some mystical reason my cupcakes kept turning out like corn bread or muffins rather than light and fluffy deliciousness! I was pissed and quite aggravated.
He gave me some helpful pointers, but it turns out the main reason was because I wasn’t creaming my butter and sugar long enough. Also, I was probably over mixing the batter at the same time too.
So now that I worked that out, what you want to do is take your butter at room temperature and with a hand or stand mixer crème your butter and sugar together anywhere between 5 and 10 minutes. I go for the full 10 because I don’t have a nice stand mixer yet.
After that, put your mixer away and use a spatula to fold the other ingredients into the whipped sugar and butter. I started with another bowl to combine my dry ingredients and whisk quickly to distribute the baking powder and soda evenly.
First I incorporated the eggs and orange juice, [please don’t use store bought… you must be kidding me!] stirring just enough to break the yolks and mix the juice. Then in three additions I folded in the dry ingredients, in between adding a little heavy crème as well. Fold the batter just enough so that it is even; you really don’t need the hand mixer at all. It only takes a minute with the spatula to do all this!
Fill your cupcake liners three quarters of the way and bake at 375F for 20 minutes on the top rack of your oven! Checking after the 15th minute just to be safe. Once you can pull a clean toothpick out of the center, they’re done! Let them cool while you make your frosting.
Ingredients for Orange Butter Crème Frosting
• 1.5 sticks of butter – room temperature
• 1 to 2 cups of confectioners sugar
• Half a squeeze of an orange
• Zest of same half of orange
Mix your butter and orange juice together, and then slowly add the confectioners sugar until desired consistency and sweetness is achieved! Add a little crème cheese if you like, again… At room temperature! I just had a friend at work that doesn’t like crème cheese so I left it out, normally I’d put 4 oz in this recipe otherwise!
If you don’t have a piping bag, fill a Ziploc bag and cut a small hole out of one of the corners, it’s basically the same thing! And I love how it looks, like it’s not trying too hard but it’s definitely got a little pizzazz, haha.
If your consistency is a little runny, either add more sugar or put it in the fridge to set up a bit! Now move on to the bittersweet chocolate ganache!

All you do is heat up a little heavy crème on the stove, and break apart some 85% dark chocolate and mix together… I used very little heavy crème because I wanted that bitterness to it. If you use too much heavy crème, you’ll just end up making milk chocolate so it’s up to you!

Once your heavy crème is boiling pour it over your dark chocolate and let stand for a minute or two. Then stir together. The more you mix the chocolate the thicker and denser the consistency will get; I wanted mine fairly runny so I barely mixed it at all.
Core out the centers of your cakes and spoon in the chocolate once the cupcakes have cooled. Then ice over the top to hide the chocolate!

Ingredients for Candied Orange Peels
• Two or three Naples oranges
• 1.5 cups of sugar
• 2 cups of Water
• Candy Thermometer
Start by peeling the oranges, to make this easier slice off the tops and cut into the peel in 4 segments, not cutting too deep into the fruit. After that, slice your peels into thin strips. Take a deep skillet and place your oranges inside, fill with water just so the oranges are covered.
Heat to boiling and blanch in cold water, do this at least three times! This removes all of the bitterness of the pith of the orange [the white bitter part of the skin].
Take your sugar and 2 cups of water and mix well. Heat on the stove on high for about 7 minutes. Using a candy thermometer make sure it is between 225 and 230 degrees F. This is called the ‘thread’ stage because if you drizzled a little sugar in cold water it would have a similar consistency.
Add your orange peels and once they are submerged do not stir them! If you stir them you could form unwanted crystallization. Reduce heat to low and cook for about 45 minutes to an hour. Test one and see if it’s sweet enough for you, if not… Keep cooking them!
Drain the simple syrup and save it! You can make ice tea or wonderful mixed drinks if you’d like, and the orange flavor will carry through into those beverages! Let the candied peels cool, and roll in extra sugar.
You’re supposed to let them dry for 5 hours or something like that, but I’m hella lazy so I baked them at 375F for about 25 minutes and it dried them right out! Haha.
Dip them in extra ganache you have left over and garnish the hell out of those cupcakes! I baked a little extra orange zest to sprinkle over top too. It’s just how I roll, haha.
Well guys, I have about 5 recipes on standby that I still need to write… But they are on their way! I’m hoping to get through a couple more today since it’s my day off, but I can’t make any promises! ;P
Hope you guys enjoy this one; it’s a ton of work… But totally worth it! Till next time foodies,
Justin Francis Kane
.


